RSS Feed

Posts Tagged ‘simple solutions’

  1. I Know Your “Chicken”

    December 21, 2015 by admin

    12341322_10208364235247228_2027019583423696611_nWinter is soup season, as much at the TR Home as anywhere.

    Chicken noodle soup is a classic that many people remember fondly from childhood, and treasure on a chilly day, or when they are a bit under the weather.

    But we’re a vegan/vegetarian house!  How can we have all the yummy of goodness of chicken noodle soup while staying within our dietary guidelines?

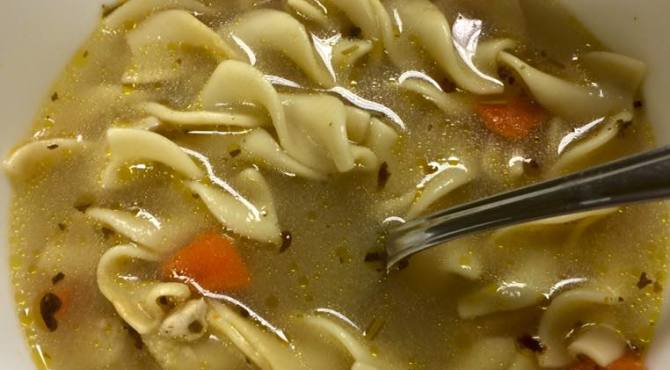
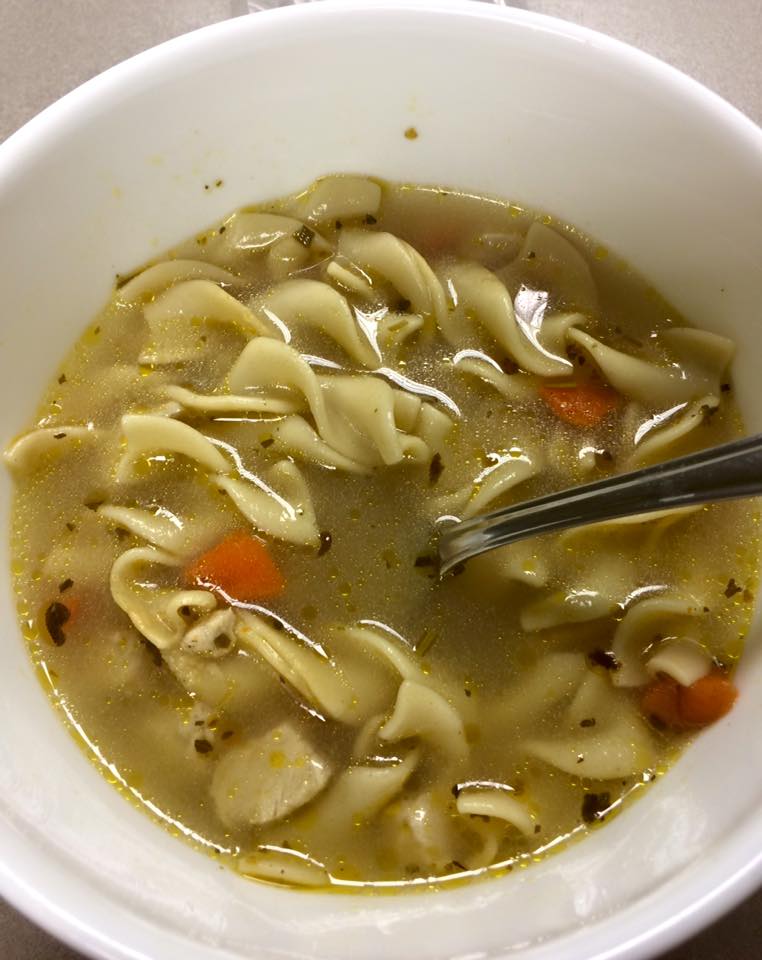
    Enter: “Chicky” Noodle Soup, a delicious version of the classic that can be made vegan or vegetarian while keeping all the yumminess you expect and remember.

    “Chicky” Noodle Soup

    Ingredients:

    1 Package Beyond Vegan Chicken Strips (or equivalent)

    2 Carrots

    2 Celery Stalks

    1 Onion

    2 Garlic Cloves

    4 -6 Cups Veggie Broth* (or Water)

    1 teaspoon Oregano

    1/2 teaspoon Rosemary

    Salt & Pepper to taste

    2 Cups Noodles**

    Process:

    1.  Partially defrost vegan chicken strips, enough so they can be diced.

    2.  Saute Onions, Garlic and Carrots in bottom of soup pot for six minutes or so.

    3.  Chop or grind rosemary in a spice grinder or with a mortal & pestle.  Add to sautéed vegetables.

    4.  Add diced vegan chicken.

    5.  Add broth or water and bring to a simmer.

    6.  Add noodles and cook 10 minutes until soft.

    7.  Add Salt and Pepper to taste.

    Enjoy!!

    Invite a friend over to share!

     *  Make your own veggie stock:  The next time you chop onions, peel carrots or use celery, take the peels and bits you don’t want (so long as they are not spoiled!) and boil in water for 45 minutes to an hour.  Things to include in your veggie broth: onions, carrots, celery, parsley.   Thing to avoid in your broth: potato peels, pepper innards, beets.   If you don;t have veggie broth, you can use a vegan vegetable bouillon, available in most groceries.

    **  What noodles to use:  For a more traditional ‘Chicky’ Noodle Soup, use egg noodles.  But these are not vegan.  If you like a vegan soup, we like to use bowtie pasta.  As it gets very cooked, the bowties partially unfold leaving large, flat noodles of deliciousness.


  2. Fire Pit!

    August 2, 2015 by admin

    IMG_1722This TRFamily loves a cozy fire crackling in a fireplace on just about any evening of the year.

    It has been too long since we’ve had a house with a fireplace or property well suited for a fire-pit.  But the wait has finally ended!

    After some quick research on reviews and a few days of best-price hunting, we picked up a very affordable fire-pit from our local chain, Farm&Fleet.

    It required some simple assembly that took about 20 minutes to complete from start to finish.IMG_1590

    Tip1: Be careful of the size of the bowl you are considering when researching what might work best for you. Your bargain find may have a very small burning surface which doesn’t work out well. We went with a 30 inch fire bowl and couldn’t be happier!

    We are fortunate to have a cement slab “deck” area in our backyard that is perfect for safely positioning a fire-pit. Make sure you consider the placement of your pit carefully and have access to the usual fire safety tools.

    TRDad spent a good amount of time discussing proper fire building with our young Bluey.  TRDad also made sure that Bluey understood that you must respect your fire and use great caution while stoking or minding it.  They gathered up kindling and before long, our first fire was burning bright.

    Tip2: Keep the makings for S’mores tucked away in your pantry.  The ingredients are super cheap and the enjoyment is guaranteed.  You can even find vegetarian marshmallows at most specialty stores and coops.

    A fire-pit is a great addition to a backyard.  But it does require a full commitment to safety.  Your home, neighbors, pets, and children are very susceptible to injury from an unattended fire.  But with the properattention and tools, you’ll enjoy it for years to come!!


  3. Shop Local

    July 27, 2015 by admin

    IMG_1508We recently had the unfortunate experience of discovering that our dryer wasn’t heating up at all during any selected cycle.  Our clothes were wet and cold when the finish bell sounded.  And since we aren’t interested in purchasing a new dryer at this point, we needed to figure out if it could be fixed.

    *Our home came with a 1 year home warranty which covers all the major appliances.  We will discuss this home warranty soon, but for now we’ll just let you know this repair route hit a dead end.

    Our internet research indicated that our dryer’s symptoms were pretty common and could be repaired. TRDad doesn’t have a lot of experience just yet on fixing appliances.  He and Bluey did some exploratory poking around the machine but came up short.  We were going to have to locate a repairman.

    We knew that the big chains, like Sears, had repair services.  But we were a little wary of price and convenience.  Our trials on getting the dryer repair set up through our home warranty had left us stranded on Saturday and our clothes were piling up.  We turned to Google and crossed our fingers.

    Luck smiled upon us and we located Gary’s Appliance Repair.  We had little to go on as this business had no homepage and only a few simple online reviews.  But one phone call had Gary heading to our home.  He arrived within 30 minutes of our initial contact!

    Gary rolled into our driveway in a very old mini van.  He looked to be on the tail end of sixty, had suspenders attached to his work pants, and was very friendly.  Gary didn’t mind our pets or our inquisitive and talkative Bluey.  He hummed a little tune as he got right to work on our dryer, quickly identifying the issue.IMG_1511

    No more than 30 minutes from Gary’s arrival, our dryer was repaired.  Since Gary was so friendly, TRDad now has a much better understanding of how to go about fixing the dryer in the future.  And Gary’s invoice was incredibly reasonable- no emergency weekend fee involved!

    We highly recommend Gary’s Appliance Repair if you live in our area.

    Do you typically reach out to locally owned and operated services or do you go right to the national chains?


  4. Let The Sun Shine

    July 21, 2015 by admin

    IMG_3141Our new, sun-filled yard has allowed us to rediscover the joys of sun tea- and pass this pleasure on to our kiddos.

    Spending most of the day flooded in sunshine, our backyard is the perfect place for making sun tea!  You can make sun tea in any large glass jar- a throughly washed pickle or olive jar can work quite well.  But we picked up a sun tea jar at our favorite grocery for a few bucks – and it includes a dispenser tap at the bottom.  This way even our youngest can pour himself a glass of tea without difficulty.

    The recipe is simple: fill you jar with cold water and add a few bags of tea.  We use five with our approximately half-gallon jar.  Use more if you like a stronger tea.   You may find different tea flavors require different strengths to turn out the way you like.  Let the tea sit in a bright part of your yard for most of the day- the longer it sits there the stronger it gets.

    Tip:  If it gets too strong, you can water it down with water or ice cubes when you drink it.

    We keep our tea in the fridge and it cools down quickly to just the right temperature.  Add ice as desired.

    Our youngest loves watching the tea darken during the day, and particularly enjoys sampling the fruit flavored teas.  Try it out and find your favorite flavor!


  5. Come Kale Or High Water

    July 6, 2015 by admin

    IMG_1266We are always looking for ways to introduce nutritious snacking option to our kids.

    Kale chips are a low calorie, super easy, and very tasty choice that you can make at home in less than ½ hour.

    Pick up a good bunch of Kale from your local farmer’s market or favorite grocery store.  Wash the leaves and then dry all of them thoroughly.  Next, cut the leafy green away from the stalk.  But don’t just throw out those stalks!  You can save them for soup stock!  Or chop them down and saute them into your next stir fry.  Or feed them to bunnies!IMG_1263

    We hear kale is pretty easy to grow in your garden.  We haven’t tried that yet, but we’ll let you know when we do!

    Tip1: If you fold the kale along the stalk, you can easily cut straight down to separate both halves from the stem.

    Use your fingers to rip down the leafy parts into chip size pieces and put them into a large bowl.  Toss theKale with olive oil and coarse kosher sea salt and set aside.  Line a cookie sheet with tinfoil or parchment paper.

    Tip2: We put a coat of olive oil on our tinfoil.

    Distribute the Kale in an even layer on the cookie sheet.  Cook at 350degrees for 10 minutes.  Rotate your tray and perhaps flip your kale.  Cook for an additional 10 minutes or until you’ve got your desired crispness.

    Enjoy!


  6. Stok It!

    June 28, 2015 by admin

    IMG_1123We had been discussing the purchase of a grill now that we had our own property and yard. And with careful planning, we had some money stashed away for these types of bonus purchases.

    Our STOK drumgrill is a welcome addition to our new home!

    We stumbled upon this orange beauty on a recent trip to our favorite box store. A quick google search proved their price (with 5% off and Redcard member discount) was not to be beat. We eagerly purchased it.

    We so infrequently grilled out in the past, that we were a little apprehensive about the functionality of the STOK and the ease of preparing our meals. But our new grill outperformed all our worries.

     Assembly – under ½ hour with the need for a screwdriver.

     Initial heating – discovered that we needed a few applications of lighter fluid to really bring our grill up to temp rather than simply lighting paper as the instructions recommended.

     Performance – We had a nice distribution heat on the main surface with no hot spots. But we highly recommend the purchase of a heat glove to handle the various accessories and lid.

     Clean up – It was a breeze. The entire grill was cooled down in less than 3 hours.

    Tip: Briquettes are a fire hazard. Be sure to properly handle their final disposal.

    We enjoyed our STOK grill meal so much that we are already planning future meals and an entire season of enjoyment.

    We did establish safety rules for our kids. Our grill is set up on a small concrete patio and our TRFamily rule is that when we are grilling, you are NOT allowed on the entire concrete area without asking permission of an adult first. Be sure to discuss safety and grilling with your family, too.

    Enjoy the summer!


  7. Hip To Clips

    June 22, 2015 by admin

    1-1232906989AtaJOur cupboards have numerous opened bags of chips, cookies, crackers, and nuts.  It is an epidemic of partially consumed snack foods that typically turn stale before anyone finishes an entire bag.  We favor Ball jars for a lot of snack foods, like nuts, some crackers, and cookies.  But chips just don’t work well in our glass Ball containers.

    We tried rubber bands to keep bags closed.  And it worked for a while.  But the kids tend to struggle with the bands or flat out refuse to use them after getting painfully snapped on occasion.  (Also, loose rubber bands in our house present a health hazard for our cats who will try to eat anything they can get their little claws upon.)

    The big clips labeled for chips in most box stores just don’t last long and they tend to slide off the bag.

    And then we discovered binder clips- regular office grade binder clips.  A box of 12 large binder clips cost around $3.50.  Compare that to a decorative selection of “chip” clips priced around $7 for just 10 clips.  Binder clips are definitely the frugal choice.  And binder clips stay put in place!IMG_3162

    Tip1:  Your unused binder clips can be stored right on the shelf where your chips are housed.  Just clip over the shelf and fold back the arms.  So not only do they work well, but they are always on hand!

    They even come in fancy colors (though that typically raises the price) and an assortment of sizes.

    Tip2: The smaller sized clips are perfect for bags of frozen vegetables stocked in the freezer!

    What are your food storage life hacks?


  8. Car Tunes

    May 13, 2015 by admin

    It’s no secret that this TRFamily loves music! IMG_0766

    One place we always have the tunes playing is the car,  Nothing is more fun, or helps a long car ride, like a family sing-along.  So when we purchased our newest car and found its older radio was not compatible with iPod music players, we knew we’d pretty quickly have to swap it out for a different receiver.

    Why is this so important?  Well, for a couple of reasons:

    1.  We love the no commercials and no sometimes shocking news reports version of listening to music via our mp3 equipped phones.

    2.  Our iPod enables us to create long custom lists featuring songs everyone in the family likes.  We all know the words to most of the songs on the playlist, so everyone can join in and sing, or play an awesome air-guitar lick.

    After some internet research, we were able to find an inexpensive but reliable unit that would fit in our car.

    IMG_3057Then Bluey and TRDad got to work putting it into the car.

    Installing your own car stereo is a fun and worthwhile project.  Along the way we were able to cover a variety of topics including:

    Safety rules (like disconnecting your car battery before you start).

    Color matching while sorting wires for the adapter cables.

    The importance of reading instructions and proceeding carefully and methodically with a big project.

    Hands-on skills of using screwdrivers and wrenches correctly.

    And the all important value of Doing It Yourself

    Naturally, Bluey got to take the old radio apart.IMG_0786

    Our project took most of a Saturday morning.  It rewarded us with a great new stereo unit and the satisfaction of knowing we’d done it ourselves.  We know our Bluey will remember this for a long time.  Next time something breaks on the car, or some piece of electronics needs to be upgraded, he’ll be ready to take on the challenge.


  9. Science Is Fun

    April 19, 2015 by admin

    IMG_0615 Our Plum recently went to a science fair hosted by our local University.  Among the various exhibits and presentations, Plum discovered Oobleck.  It’s fun to say and even more of a good time to manipulate!

    The recipe is super simple:

    • 1 part water
    • 2 parts cornstarch
    • a drop or two of food coloring if you desire


    Mix all of the above together until you have a consistency that works for you.

    IMG_0617Your kids will be fascinated by the Oobleck.  You can punch it and it will resist penetration.  You can scoop some up and form a ball.  But if you flatten your hand while holding the ball, the Ooobleck will slowly ooze from its original shape and drip back into your bowl.

    Let your kids explore and learn from this neat mass.  The clean up is a breeze as  Oobleck dissolves in water.


  10. Hit The Highway!

    April 12, 2015 by admin

    IMG_2935Our Bluey recently had a rough go of racing our slot-cars one afternoon.

    Of our two cars, he could only get one to go around the track much at all.  It would stop periodically and need an adjustment.  The other car hardly moved on the track.

    We were so excited to do some racing so it was a real disappointing time while we tried repeatedly to adjust the track and wiggle the wires trying to figure out why the cars wouldn’t work.

    Finally, while trying to clean the bottoms of the cars, we noticed that the contacts (where the cars touch the copper strips imbedded in the track) had holes worn through them.IMG_2931

    We didn’t know what to do, so we headed to our local hobby store thinking maybe we could buy new cars to race.

    Instead, we found out that if you’re willing, you can replace these worn out parts yourself.  Rather than spending $20 or more on new cars- as much fun as that would be!- we were able to get replacement contacts and springs for just $3.IMG_2934

    In a few minutes of repair time back at home, we were  in business and tearing up the track!  The process of repairing the cars was fun for our Bluey, who loves to know how mechanical things work.  Even though he lost part of a day of racing, he still had a great time.

    So here are some tips:

    1.  When in doubt, ask the experts for advice.

    2.  Many things, even your toys, can be repaired rather than replaced.IMG_2932