RSS Feed

Posts Tagged ‘Holidays’

  1. Salty Fun!

    December 17, 2012 by admin

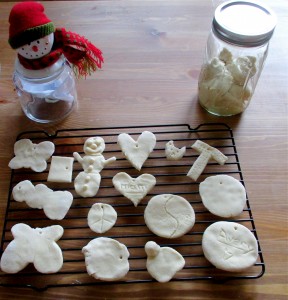
    IMG_1240

    Until recently, we had not experienced the joy of salt dough projects.  It was just one of those crafts that we never got around to doing with our kiddoes.  But we discovered we had been missing out on a ton of fun!

    It is beyond easy to knead together a batch of salt dough:

    • 1 cup of salt
    • 2 cups of flour
    • 1 cup of warm water


    Mix all your ingredients in a large bowl and work it with your hands for about 5 minutes.  If you find that your dough is tacky, slowly add more flour until you can easily manipulate the dough without it sticking to your fingers.

    IMG_1246You can then break your salt dough into separate batches and add food coloring.  Or you can decorate any completed project once it hardens up.  We found that most thin shapes take about 12 hours to harden with air drying.  We did not bake this dough, though you can if you are in a rush.  The above recipe yielded about 14 ornaments and a large amount of IMG_1251leftover dough.  Kept in an airtight container, your dough will stay fresh for many more days of fun crafting!

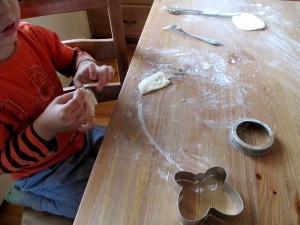
    We decided to work our salt dough into ornaments for handmade gifts.  It was incredibly easy for our kiddoes to create shapes – much like Playdough!  We used butter knives, canning lids, and cookie cutters to help with our designs.  Since we were making ornaments, we had to remember to poke a hole into our final shape before the drying process.  We laid our ornaments out on a drying rack and allowed them to set overnight.  Now, all that remained was the decorating.

    Don’t feel that salt dough is limited to ornaments during the Holiday season!  You can make any shape or design, allow it to dry, and glue a magnet to the back.  Or you can poke a hole in a shape for a lovely handmade necklace charm.  It can be used to make animals and figures to play with (totally non-toxic!!), or to create additions to dioramas.  There are so many crafty options to explore for frugal ways to make meaningful gifts, or just to have some fun family time.  And everything will be from natural ingredients that are typically found easily within a cupboard or pantry.

    Mix up some salt dough and see what you can create!


  2. O Tannenbaum! O Tannenbaum!

    December 11, 2012 by admin

    Every year, our family heads out to find and cut down our Christmas tree.  We love the traditional experience of trekking into the December air to locate the tree that everyone in our family agrees is the “perfect one,” cutting it down ourselves, and hauling it home to be decorated.  

    The TR family considers Hann’s Christmas Tree Farm to be the BEST local place to find a Christmas tree!  We’ve been going here for our tree ever since we relocated to Wisconsin.  We highly recommend that you consider this family farm to be a part of your Christmas experience, too.

    The property is expansive and includes cut-your-own, or pre-cut varieties, of every type of Christmas tree available.  They also offer:  a charming gift shop, free hot cider, fresh popped popcorn (.50cents a bag), wreaths, free tractor pulled wagon rides to the cut-your-own fields on the farm, visits after 10am from Santa and Mrs. Claus, and a playground!  They also have numerous saws for you to borrow if you plan to cut down your own tree- which we recommend for maximum holiday fun.

    Parking is free and the large lot fills up quickly after 9am.  The staff will prepare your chosen tree for transportation home and they even offer to help strap it to your vehicle.  Most trees range from around $35 to upwards of $200 dollars.  We found our fabulous Frasier Fir, 7ft tree, for $49 and we couldn’t be more pleased with it!

    Tip:  Dress warmly and keep in mind that there are only porta-potties available, so change that baby before heading out!

    The friendly and knowledgeable staff will try to point you in the perfect direction to find the tree that you describe to them.  But we’ve always found that we have the most luck by just randomly walking through the fields while examining what is ready for harvest.  Plan on spending at least 1 hour at Hann’s Christmas Farm and enjoy the commencement of your holiday festivities!


  3. The Weight of Frugality

    December 9, 2012 by admin

    As you know, we are a frugal and thrifty family.  Trimming costs is considered a challenge for the TR family that we thoroughly enjoy chasing!  We have no shortage of suggestions for ways to get into museums, zoos, and activity centers for free.  We rarely eat out or buy retail anything.  Our furniture is mostly used and most of our clothes are from funky thrift stores.  In short, we practice what we preach.  And we have incredible, joy-filled experiences.  Our whole family loves shopping for a bargain, and finding new ways to put older items to use.  But we aren’t just choosing this life-style.  We have to perfect it in order to function.

    There are times, especially around the holidays, when we wish we could throw caution to the wind and just splurge!  But we don’t.  Our holidays are planned events.  And we don’t mean that we start stock-piling secret stashes of gifts in October.  We seriously plan it out.  We tuck away a small holiday fund at the start of the year and we use a spreadsheet to help allocate every penny.  By planning and carefully managing our money-flow, even during the holidays, we are able to provide great experiences for our family- from swimming lessons to trips to cool places.

    We would LOVE to be able to shower our family with gifts and trips spontaneously throughout the year to take the main focus off of Christmas.  But our budget doesn’t allow for those extravagances.  Instead we leave little handmade love notes throughout the year.  We splurge on frozen pizza for our in-home date nights.  And we purchase a small matchbox or a magazine as a treat for the kids when we’re able.  Every now and then we manage to save enough for a short family vacation.  And we are generally okay with functioning this way.  We have a tremendous time together!

    Any additional savings that we manage to amass is used only for emergencies.  And there are always enough emergencies- tires for the car, antibiotics for a sick child, a slightly larger than anticipated electric bill.

    The holidays are the only time of year that we sometimes feel the burden of our lifestyle.  When we look around and think, “Oh!  To be able to purchase every single thing our kids have on their Santa lists!”  When we’re being flooded and ambushed with consumerism, it is hard to keep squared-off shoulders.

    But we do a pretty good job of it.  Here is a short list of ways we manage the holidays on a limited budget:


    >Create a small savings account when and if you’re able, at a bank you don’t utilize for your everyday business.  By keeping your holiday money at a different bank, you are less likely to dip into it during one of those emergencies.

    >Take advantage of every post-holiday clearance to begin stashing away stocking stuffers, etc.  Target is a gold mine about two days after any holiday!

    >Stock up on non-perishable grocery items when they go on sale for the anticipated up-tick in holiday cooking.  This way we aren’t suddenly hit with a super-sized weekly grocery bill!

    >Utilize the Dollar Store – you’d be surprised at their supply of arts and crafts.  And they take manufacturer’s coupons!

    >Make some gifts on our own.  By investing more time and less money, you can make some pretty cool gifts.

    >Individually wrap everything.  Everyone loves a huge pile of gifts under the tree!

    >Recognize your limitations and don’t add the expense of gifts onto a credit card.  By planning ahead, we are able to avoid the credit card trap every year.  This gives us more spending money during the rest of the year.

    And we also recognize that we are truly blessed.  Our financial struggles are nothing compared to the trials of many.  Although we sometimes wish we had a more generous budget, we find ways to make our budget work for us, so we can still have the festive, fun holidays that we will remember for years to come.

    How do you plan for the holiday season?


  4. Ho Ho Holiday Tunes!

    December 1, 2012 by admin

    It’s time to track down all the new holiday music!

    Last year, we opened up our own “Holidaze” Playlist in November, and noticed that it held over 750 songs.  So we challenged ourselves—could we find the 250 songs we’d need to bring it up over 1000?

    Challenge Answered!  At the end of last season, our song list topped 1200 holiday tunes.  We could run our own little Christmas radio station right out of our house.

    Where did we pick up over 300 new and free holiday songs in less than 6 weeks?  It was easier than you might think.

    Our secrets to getting a ton of Holiday songs for Free:

    • Amazon: It’s not up yet, but Amazon hosts “25 Days of Free” each December.  Every day features a new song, usually by a top artist.
    • iTunes: Each week, between now and the New Year, the iTunes store offers one or two holiday songs by well-known music stars- this week it’s Rod Stewart!
    • NME: Britains New Music Express offers a free Mp3 a day, and features many holiday tunes this month.
    • Music blog I am Fuel/ You Are Friends offers numerous free mp3s all year long, but in December they trend towards Holiday songs.  Great covers and original ditties abound.
    • Noisetrade:  Already Noisetrade has offered free holiday albums by Sufjan Stevens, Over The Rhine, and Fiction Family.  What else will they offer?  Check them out and find out.
    • BBC: This music blog on the BBC is offering holiday tunes each day in December.  Some of the tunes are direct downloads, some of them you have to go to the band website or somesuch for a download, but they are all free.  Many of these are from European bands you may not have heard before.


    As we find new sources for holiday tunes, we’ll update or list.


  5. Holiday Craft Ideas

    November 27, 2012 by admin

    By Brenda Winter Hansen

    When the winter holidays roll around, I have to constantly fight my Charlie Brown tendency to get all excited only to be let down by how vacuous and fraught it can all seem, especially when the budget is tight. I’ve found the best defense (besides sharing food with friends!) is carving out a little time to help the kids make thoughtful and easily completed crafts for keeping or giving. I’ve collected some worthy standards and a couple new ones to share, so have a look and be inspired to make a little mess with your kids this season.

    Handmade gift tags/bookmarks-Colorful card stock plus string (think yarn, embroidery thread, or something sparkly) is the basic recipe for speedy gratification. You’ll also need cookie cutters, a hole-puncher, scissors, markers, and quite possibly glitter glue. I know it’s so cheap to buy stickers made in China to slap on your gifts, but why not let the younger set make and decorate gift tags with a more personal touch? Colorful card stock is easy to come by from a local craft/paper shop, as is embroidery thread, decorative string, or yarn. Trace cookie cutters onto the card stock and cut them out. Be careful not to punch a hole too close to the edge of your tag or the string will rip through. Cut lengths of string about 10 inches long and attach each one to a tag. One side can be decorated and the other can be the To/From side, resulting in an ornament worth hanging! Cut the cardstock into long rectangles and you have lovely bookmarks.

    Felt ornaments- These are great for giving and keeping. You’ll need several sheets of colored felt, depending on how many ornaments you’d like to make, string/yarn/embroidery thread, pillow fill (optional), a basic sewing kit, glitter glue and decorations are optional but nice. Use cookie cutters as stencils for shapes. Don’t bother to punch a hole for the thread, just use a large-eyed needle for pulling string through to hang it. Ornaments can be a single layer of felt or, if you cut two pieces of the same shape, you can make a tiny pillow ornament by sewing the two pieces mostly together, stuffing them with pillow fill (from fabric store) and finish sewing up the rest. Sequins, glitter glue, and sewn-on scraps of felt are great for decorating the ornaments, just make sure all glue is thoroughly dried before packing these up as gifts or hanging them up. Here’s a link to a free template for felt mushrooms. http://thelongthread.com/?p=5237

    Back in the Stone Age, when I was a kid, my parents did the Yule tree decorating in the dead of night while all six of us were asleep. We’d wake up to the magical beauty of a tree that stretched from floor to ceiling and was covered with enough bling to weigh down an LA pimp. In retrospect, I think it was their version of “date night” during the busy and penny-pinched holiday season. My mom explained once that they each had favorite ornaments to hang, but there were two homemade painted cookie ornaments that waited until last. Dad would hang up “hers” (an angel), and Mom would hang up “his” (a tin soldier), and then they kissed. Not kidding. And you know what? Those cookies lasted forever! What I’m saying is, make these cookies, but do not eat them. Make them into a memorable tradition whether you have a tree or not. Make one for each child and creature in your household. Hang them on the mantle, in a doorway, on the wall. Have fun and be hopelessly romantic. Oh, and it would probably be a good idea to make some edible dough too, or you’ll never hear the end of it.

    Inedible Cookie Ornaments

    300F for 1 ½ hours
    Ingredients:
    3 Cups Flour
    1 Cup Salt
    1 1/2 Cups Warm Water

    -Mix flour and salt and then add water gradually and knead dough.  If the dough is too dry, add water.  If it is too sticky, add flour.

    -With flour to reduce sticking, roll out dough onto baking paper until the dough is about 1/4″ to 3/4″ thick.  The thicker the dough, the longer they will need to bake.

    -Use cookie cutters or hand shape each ornament and place on parchment paper-lined baking sheet. Don’t forget to make a hole in each ornament before baking.

    -Bake at 300F for about 1½ hours. Flip ornaments half way through. Cool completely before decorating with paint, glitter glue, beads, etc. Make sure to use newspaper or parchment paper underneath the decorating station, because it is guaranteed to get messy!

    Linocut holiday cards– This project requires a little more time and money investment, but you’ll be able to use the tools for ages. It’s a great project for the whole family. Some parts of it are suited for an older, steadier hand, and others can be done by the youngsters. You’ll need a linoleum cut set (from a craft store) a couple sheets of linoleum (good to have one to practice on), transfer paper (optional but very helpful), ink roller, bright card stock, and ink. Watch this video http://www.youtube.com/watch?v=kE3Uuhylur0 for a quick demo. If you’ve never done this before, then pick a simple image for your card, like a snowflake or a star. Adults and older children are better suited for using the sharp cutting tools, but smaller kids should be able to help inking the roller and applying it to the cut linoleum. You’re the best judge of your child’s ability, so make sure their task is one they won’t get frustrated with and can be proud of as well.

    Here’s another card idea (low-tech & less expensive) for the older ambitious child: http://extremecards.blogspot.com/2012/01/easy-pop-up-snowflake-cards.html

    Everybody who knows them loves holiday noise crackers– So this year, finish your crafting with a bang and make your own. Fill them with silly things or goody jokes to surprise friends. It’s pretty easy to do these on the cheap and well ahead of time, so they’re perfect for bringing to a party or having them ready for a post-dinner pre-dessert treat. The snaps can be found quite inexpensively online at Old English Crackers. Have a blast!

    http://crafts.kaboose.com/christmas-cracker.html

    http://www.oldenglishcrackers.com/christmas-cracker-components-c-4.html

    HOW TO ASSEMBLE YOUR PARTY CRACKER

    Either use our pre-sized Cracker Tubes (105 x 50mm) or make your own by preparing 3 rolls of card, each 10cm wide x a suggested 30cm, rolled and taped to form a tube of diameter to suit the gift to be included.
    The first roll will be left in the cracker, the other two are for use as temporary end formers and will be removed once the cracker is made.

    Cut crepe paper 35cm x 35cm per cracker (or larger if you wish). You may also use tissue paper, cake board paper, or fancy gift wrap for colour effect. NOTE: THE PAPER YOU USE MUST BE ABLE TO BE TORN EASILY.

    Arrange the rolls on the crepe paper along the grain of the paper. Lay a Cracker Snap between roll and paper, then roll the paper to cover.

    Gently withdraw one end roll approx 2cm (1 inch) then twist and gently (but firmly) tie the crepe paper between the centre and one end roll. Tie the crepe paper securely with narrow ribbon.

    Fill the centre roll with novelties, personal gift, jokes, paper hats, lollies, etc.

    Similarly gather and tie the second end with narrow ribbon.

    Decorate your own special party crackers with ribbons, transfers, stickers, glitter etc. The choices and variety possible is endless.

    The two end cardboard rolls have been used to maintain the shape throughout the assembly process. They may now be removed to use again on your next cracker.

    With a friend, each hold the snap, then give it a quick sharp pull for the BANG. http://www.goldingcraft.com/cracker.htm

    Happy Holidays!!

  6. Gobble Gobble

    November 11, 2012 by admin

    Thanksgiving is just weeks away!

    We love Thanksgiving.  It is the time when we bust out our holiday DVD collection which includes family favorites like:  Home for the Holidays, The 12 Dogs of Christmas, and Elf.  We fill a giant bowl with nuts in their shells, to be cracked open with a traditional nutcracker.  Cookie baking goes into overdrive, filling the freezer with delectable bits to be organized later into Christmas box give-aways.

    Early in November, the main event menu planning begins.  What will we eat for Thanksgiving?

    Not Turkey!

    The TR family home is vegetarian.  There is no turkey as the centerpiece of our Thanksgiving meal.  But that doesn’t mean we don’t feast!  After all, aren’t some of the best parts of the Thanksgiving meal the side dishes?  Think about the tangy sweet cranberries! The steaming mashed potatoes!  The buttery string beans!  The little bowls of pickles!  The pumpkin pie!  Yummy and entirely satisfying!

    We also use this time to engage in conversation about the true history of Thanksgiving (http://www.educationworld.com/a_curr/curr040.shtml ).  We give Thanks for our family and friends.  And we try to find a way to acknowledge and support those less fortunate than ourselves.

    TR would love to know what your family traditions are for this holiday.


  7. All Hallow’s Eve

    October 7, 2012 by admin

    Chilly temps can wreak havoc on your costuming ideas!  There is not much worse for a kid on Halloween then having to cover up their costume with a winter coat.  And even though we can certainly sympathize with our kids, we aren’t going to allow them to wander for 2 hours in 40 degree weather with nothing but a gauzy witch costume to keep them warm!  Our Midwest late October weather can occasionally offer up a mild 60 degree night on Halloween.  But more often than not it is downright chilly and hovers in the mid 40s or colder.

    So how do you find a happy middle ground?

    Tip:  Remind kids that if they are comfortable and warm, they’ll be able to withstand trick or treating longer, which means – MORE CANDY!

    Our family tries to ensure that the kids commit to a Halloween costume by October 1st.  This allows plenty of time to plan out what is needed to create that special outfit.  It also permits Mom and Dad to do their best to steer the costume choices towards fabrics and designs that will best keep our little ones warm and cozy.

    For instance, our Bluey (3 ½) wants to be an astronaut for Halloween.  Mom and Dad are quite pleased with this choice as we can absolutely create a fabulous outfit with a base that will utilize a white sweat suit!  Our Plum (10 ½) wants to be a ballerina zombie.  This is not as simple.  But our early time frame again assists as we will have plenty of opportunity to either gently nudge our Plum towards a zombie character that is more “cold weather friendly,” or work with her to see how we can accessorize this outfit for maximum warmth:  leg warmers with flannel tights, long sleeve leotard top, etc.  And when all else fails, Mom and Dad are sure to pack mittens, hats, and coats in their backpacks to be prepared for the inevitable, “I’m cold!”

    How does your family adjust to a nippy Halloween eve?